
Costs and working with a vendor13 min read2448 wordsKonrad Barejko
How to make an app for your business: six stages and what you decide at each one
How to make an app for your business with a contractor: brief, prototype, sprint development, UAT and go-live. How long each stage takes and where you decide.
Two different people type "how to make an app" into a search engine. The first wants to build it themselves — often for free, in a no-code builder, over a weekend. The second runs a business, has a process that has outgrown a spreadsheet, and intends to have a contractor build it. Both see the same results, but need very different answers.
If you're in the first group, the honest answer is short. A simple internal tool — a form, a list of service requests, a basic panel — can be built today on a low code or no code platform, without writing any code. That works for as long as you fit the platform's rules: its database, screens and per-user price. We cover where that line sits in our article on low code and no code.
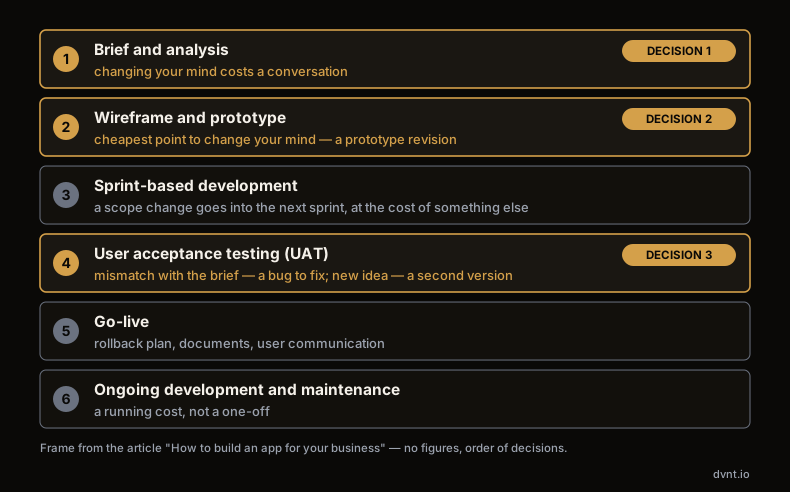
The rest of this article is for the second group. It shows how an app project with a contractor runs, and one thing that is rarely said out loud: you don't "make" an app so much as settle it in order — first what should happen, then how it should look, only then the code. Each stage makes it costlier to change a decision from the one before. You decide at three points: the brief, the prototype and sign-off. Be present for those — not every meeting.
How to make an app: start with a one-page brief
The most common early sticking point is the belief that you need documentation before talking to a contractor — a lengthy functional spec, wireframes, a choice of technology. You don't. Five fields are enough. Here is an example brief for a service-request app, in full:
field | what to write | example |
|---|---|---|
Goal | the one problem the app should solve | automate the intake of service requests and simplify communication with the office |
User | who sits down at this screen | B2B customers and in-house staff |
Features | what each of them has to be able to do | the customer reports a fault with a photo and checks its status; the employee assigns the request to an engineer and closes it |
Main screen | what's visible on the main screen | a list of requests with date, status and a filter by customer |
Priority | a condition that can't be skipped | works on a smartphone |
That's it. This brief fits on one page and is enough to get a sensible quote, because it says what should happen, not how to build it. Settling the architecture before you've spoken to a contractor usually means settling it twice.
User stories — how to write features so a contractor understands them
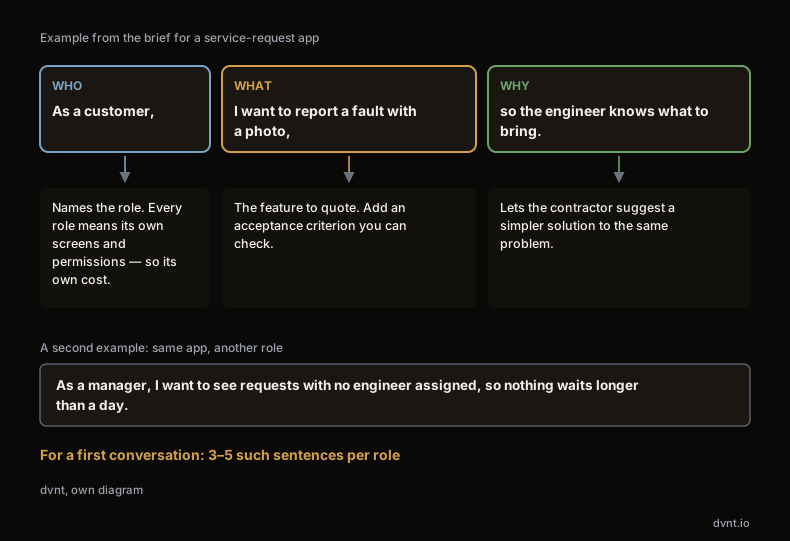
The easiest way to fill in the "features" row is the format most development teams already use: the user story, a single sentence in three parts — who, what they want to do, and why. "As a customer, I want to report a fault with a photo, so the engineer knows what to bring." "As a manager, I want to see requests with no engineer assigned, so nothing waits longer than a day."
This format has two advantages you'll appreciate at quoting time. First, it forces you to name the user — different roles mean different screens, permissions and cost. Second, the "so that" part lets the contractor suggest a simpler solution to the same problem. Three to five sentences per role are enough for a first conversation.
The checklist below covers everything a contractor will ask anyway — use it to check whether you're ready for that conversation.
What you don't need before you start
You don't need a finished graphic design — a logo and colours are enough if you have them, and a first version can be built without them if you don't. You don't need technical knowledge either: choosing the programming language, database and hosting is the contractor's job; yours is to check that they can justify the choice. Nor do you need a detailed specification — that's produced in the first stage, together with the contractor. We cover what a good brief does and doesn't contain in our article on a website brief — the same rules apply here.
Stage 1 — analysis and workshop
The first stage is a conversation about your business, not features. The contractor wants to understand how work happens today, who will use the app, where information gets lost, and which tasks are manual and repetitive. This usually takes the form of a workshop — one or more sessions in which processes, user roles and a feature map are laid out.
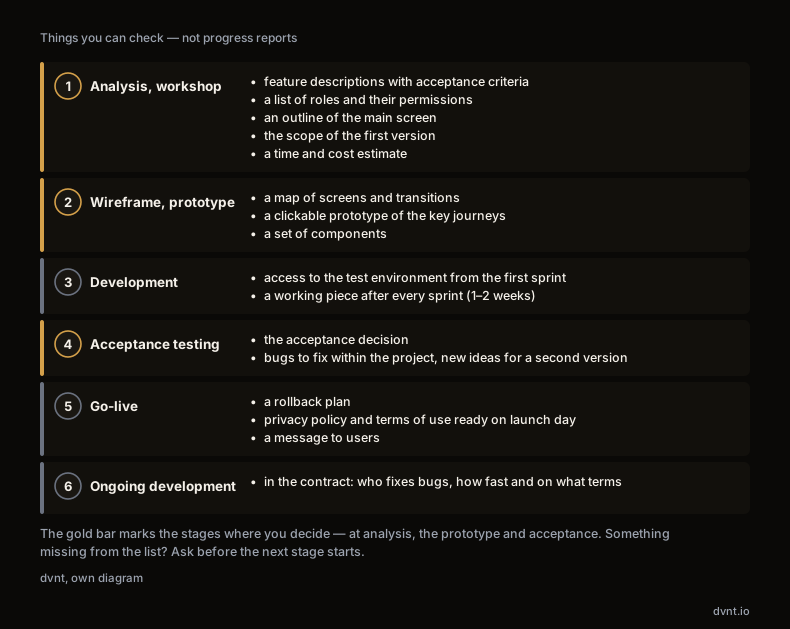
A well-run analysis produces specific things you can check:
- a description of features — the brief's user stories, expanded, with criteria that tell you a feature works;
- a list of user roles and what each can see and change;
- an outline of the main screen and the key journeys;
- the scope of the first version — what's in at launch and what's deliberately left out. We cover how to cut that scope in our article on MVPs;
- a time and cost estimate for that scope.
This is the first of the three points at which you decide. If the feature description doesn't match how your business works, this is the last moment a correction costs a conversation rather than a redesign.
Stage 2 — designing the app: wireframe and prototype
Many clients hear "design" and think of colours. But designing an app starts with logic: the screens, what's on them, how a user moves between them. Appearance comes last.
Three terms come up at this stage that are worth telling apart, because each carries a different cost:
- wireframe — the skeleton of a screen: boxes instead of images, no colour. Used to settle what goes where;
- prototype — a clickable version of the wireframes: you can click through the most important journeys before a single line of code is written;
- UI design — the final look: colours, typography, buttons — laid over a structure that's already been tested.
More on these three in our article on wireframes, mockups and prototypes, and on the difference between UX and UI in our article on UX and UI.
The prototype is the second point at which you decide, and the cheapest point in the whole project to change your mind. Show it to the people who'll actually use the app, not just management. Look for three things, because they're what most often breaks an app that otherwise works correctly:
- forms that ask for too much at once. Every field you don't need at the start is a reason for someone not to finish. The rest can be collected later;
- error messages that say nothing. "Something went wrong" doesn't help; "enter your email in the format name@company.com" does;
- navigation built around your company's structure, not the user's tasks. If the most-used feature is buried in a third-level menu, only its designer will find it.
What you get after the design stage
A web app design isn't a single file of pictures. After this stage you should get three things you can check: a screen map — a list of every view and the transitions between them; a clickable prototype of the key journeys, and a set of components — buttons, fields, tables, messages — that all the screens are built from. That last point sounds technical, but has a simple effect: when a new feature is added in six months' time, it gets assembled from existing components, not designed from scratch. If all you get is a handful of nice main screens, ask about the rest before development starts.
Stage 3 — sprint-based development
Once the design is signed off, development starts — and here is the first myth to bust: that for months "something is happening" and you see the finished product only at the end. In a well-run project, work happens in sprints — one- to two-week blocks — and after each one you see a working piece of the app.
Without the jargon, development has three layers. Frontend is what the user sees: the screens and interactions from the prototype. Backend is the logic and data: who can do what, where requests are stored, what happens on a click. Integrations connect the app to systems you already use, and each of them is a separate line in the schedule, as we'll see below.
Working pieces are reviewed in a test environment (staging) — a copy of the app that doesn't touch real data. Ask for access from the first sprint: it's the only way to catch a misunderstanding after two weeks, not two months.
At the end of every sprint, the team shows what it built. This short meeting matters more than weekly status reports, because it shows working code, not a description of progress. Come with one question: does this match the user stories from stage one? If not, a correction here costs one sprint. Raise scope changes there, not in a mid-sprint email: a well-run team adds them to the next sprint and tells you what gets pushed back in return.
Stage 4 — user acceptance testing (UAT)
Functional testing — whether every feature works as described — is the contractor's job. Acceptance testing — UAT, short for user acceptance testing — is yours. The ISTQB Glossary, the standard reference for testing terminology, defines it as "a test level that focuses on determining whether to accept the system" (ISTQB Glossary). The question isn't "are there bugs", but "is this what we ordered".
UAT is the third point at which you decide, and the only one you can't delegate. A few rules that make it easier:
- write acceptance criteria in advance, ideally alongside the user stories at the analysis stage. "The customer sees a status update within a minute of it changing" can be checked; "it should work smoothly" can't;
- testing is done by the people who'll actually use it. You don't need many — three or four per role are enough, as long as they run through real scenarios from their own work;
- test on the devices it will actually run on, under the conditions it will run in — out in the field, in the warehouse, on a weak signal;
- separate bugs from wishes. Something that doesn't match the brief is a bug to fix within the project; a new idea is an item for a second version.
Stage 5 — go-live
Go-live moves the app from the test environment to production — the environment real users work on with real data. Technically, that covers the server, domain, certificate, backups and monitoring — the contractor's job. Three things, though, need a decision from you:
- a rollback plan. Ask what happens if something breaks after launch, and how fast you can revert. A good answer is specific;
- legal documents. If the app processes personal data, the privacy policy and terms of use need to be ready on launch day;
- a message to users. An app nobody knows about won't get used. A short note — why it exists, what it changes, from when — plus someone to contact in the first few days, often beats any single feature.
Publishing to the App Store or Google Play adds developer accounts, testing and a review for every release — a separate subject, covered in our article on how to make a mobile app.
Stage 6 — ongoing development and maintenance
Launch doesn't end the project. After a few weeks, needs turn up that nobody predicted, the systems it's integrated with change, and browsers and phones get new versions. An app needs ongoing care — fixes, updates, monitoring — and that's a running cost, not a one-off.
We won't give you a percentage of project value that "should go towards maintenance" — the figures that circulate have no primary source. We break down what the bill after launch is actually made of, and what you can price in advance, in our article on app development cost.
How long does it take to make an app
There's no single market answer to this, so we'll show you ours: the rules our brief wizard uses to estimate project time. These are the planning assumptions behind our own projects, not a market measurement — but they show proportions that get lost most often in conversations about deadlines.
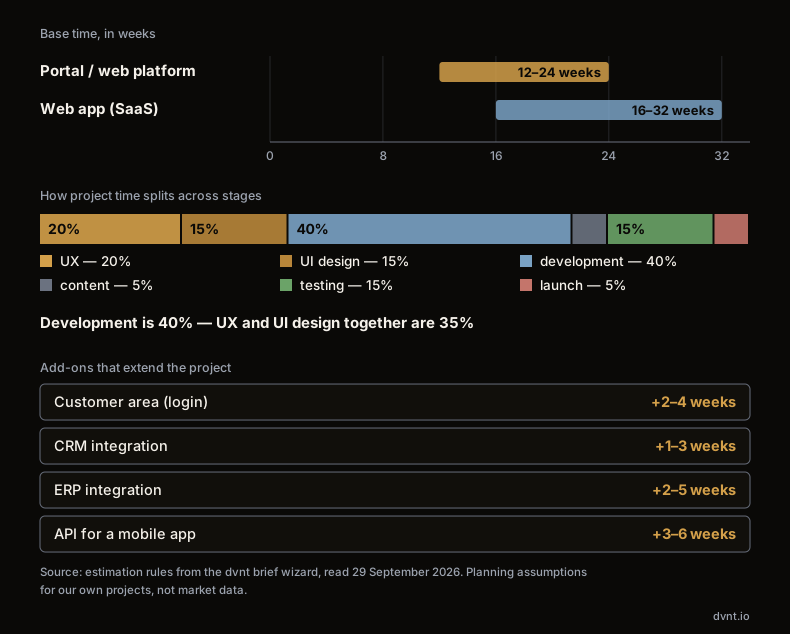
Base time is 12 to 24 weeks for a portal or web platform, 16 to 32 for a SaaS-style app. That range isn't uncertainty, it's scope: the same label covers a panel for twenty employees and a product for thousands of customers.
The split matters more than the total. In our assumptions, development is 40% of project time — less than half. UX and UI design together are 35%, testing another 15%. Planning a schedule as if an app were mainly code usually means saving on the stages that decide whether anyone will actually use it.
In weeks, a 16-week portal breaks down to just over 3 weeks for UX, 2.4 for UI design, 6.4 for development, under a week each for content and launch, and 2.4 for testing. A schedule that allows only a few days for testing at the end isn't saving time — it's shifting those weeks to after launch, when users find the bugs instead.
Some elements extend the base time. In our rules, a customer area with login adds 2 to 4 weeks; CRM integration, 1 to 3; ERP integration, 2 to 5; an API for a mobile app, 3 to 6. Each of them is worth seeing as a separate line in the schedule your contractor gives you. To price your own scope, our web application cost calculator shows the gap between a first version and a full product; our web application cost report gives the Polish market medians to set your result against.
How to choose a software house
A portfolio shows what a contractor has built. It doesn't show what working with you for months will be like — and that decides whether the project delivers what you ordered. Five questions that test the process, not the pitch:
- Who runs the project on your side, and how often will we see a working piece of it? A good answer names a person and a sprint rhythm, not "we'll be in touch."
- Will we get access to a test environment from the start? If not, the first time you'll see the app is at sign-off.
- How do you write acceptance criteria? A contractor who asks at the analysis stage is thinking about UAT from day one.
- Who owns the code, the repository and the accounts? Hosting, domain, app-store accounts — all of it should be yours, or handed over in writing.
- What happens after launch? Who fixes bugs, how fast and on what terms — worth having in the contract before you need it.
You'll find a full checklist for comparing several contractors in our agency selection checklist.
Frequently asked questions
How long does it take to make an app?
In our planning assumptions, a portal or web platform takes 12–24 weeks, a SaaS-style app 16–32 weeks. Every integration and every login-protected area adds further weeks. Development takes the most time, 40%, but UX, UI design and testing together make up more than half the project.
Can you build an app for free?
A simple app — a form, a list of service requests, a basic panel — can be built without programming, on a low code or no code platform, often on a free plan. You pay later: for users, for limits, and because the app lives on someone else's platform. We cover when that's enough, and when it stops being enough, in our article on low code and no code.
What is UAT?
UAT, or acceptance testing, is the stage where you check whether the app is what you ordered. The ISTQB Glossary defines it as a test level that focuses on determining whether to accept the system. It's carried out by future users, not the contractor, against criteria set in advance.
What is a user story?
A user story is a single sentence describing a feature from the user's point of view: who, what they want, and why. For example: "As a customer, I want to report a fault with a photo, so the engineer knows what to bring." This helps a contractor quote the feature and suggest a simpler solution to the same problem.
Do I need a specification before talking to a contractor?
No. A one-page brief is enough for the first conversation: the goal, the users, the key features, what's visible on the main screen, and a condition that can't be skipped. A detailed specification is produced in the first stage, together with the contractor.
Related articles
Web and mobile apps
How to make a mobile app for your business — from choosing a platform to publishing it
How to make a mobile app for a business: Android vs iOS in Poland, native or cross-platform, a DUNS number, closed testing and app review.
Web and mobile apps
Custom software or off-the-shelf — how to decide in a company
Off-the-shelf or custom software is decided one function at a time. Four questions, a five-year TCO with our own prices, and vendor lock-in both ways.
Web and mobile apps
Web application — what it is, its types and when you need one
A web application is not just a bigger website. The real difference, the types of web application, what they cost and when they are worth building.
Web and mobile apps
Progressive web app (PWA): what it is, how it works and when it replaces a native app
What a PWA is, how the manifest and service worker work, installing it on Android and iPhone, push notifications since iOS 16.4, and what a PWA still cannot do.
Costs and working with a vendor
How to choose a software development company — checks, contract and rights to the code
How to choose a software development company in Poland: reading reviews and rankings, checking KRS filings, fixed price vs time and material, and code rights.
Web and mobile apps
Flutter vs React Native — which to choose for a business app, and when to stay native
Flutter vs React Native: how they differ, what they cost in Polish quotes, what Apple and Google force you to update every year, and when native is better.
Looking for a vendor for a web application?
Tell us what the application should do and for whom. We start a project with a paid discovery and specification stage, so the quote covers a written scope, not guesswork.